Adding DreamboothAPI to a Bubble.io app
Setting up the API connection
Install the API connector and the Multi-File Uploader - DropzoneBubble plugin.
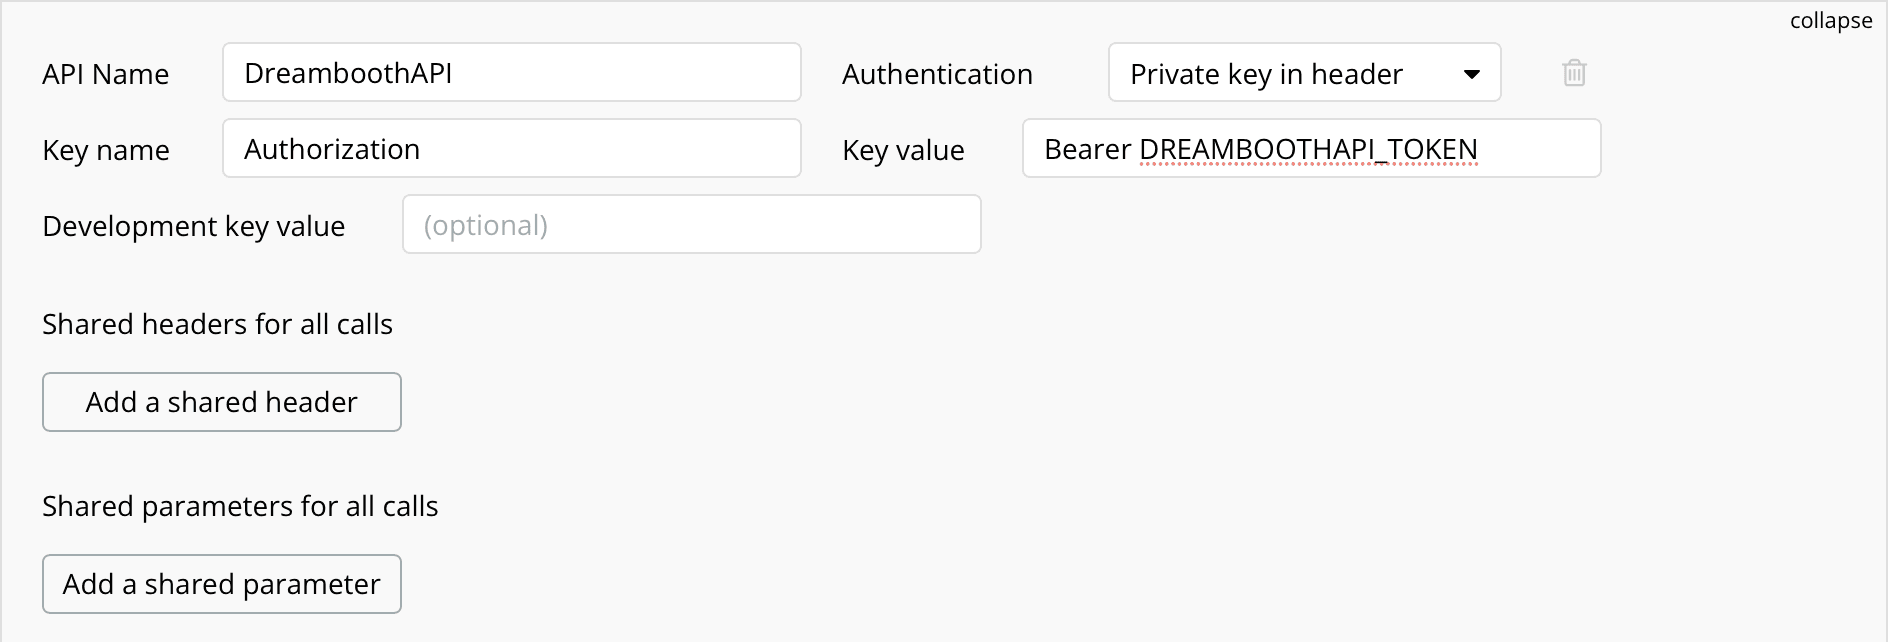
Head to Plugins → API Connector. We're going to add an authenticated connection to DreamboothAPI here.
Click 'Add another API', set the name to 'DreamboothAPI'. And then, for authentication choose the 'Private key in header' option. The key name will be 'Authorization' and the key value will be 'Bearer DREAMBOOTHAPI_TOKEN'. Replace DREAMBOOTHAPI_TOKEN with your API token, which you can find in the dashboard here.
We're now going to add three different API calls in this admin panel: POST requests for input batches, finetunes, and output batches. These requests handle the creation of Dreambooth content on DreamboothAPI. We'll also add a GET request for a completed output batch, so we can display the generated AI images to the user.
For all API calls, select Use as 'Action' and 'Data type' JSON.
Creating POST https://api.dreamboothapi.ai/input-batches
For uploading images, the 'Body type' must be `form-data`. We'll add two parameters with the keys 'label' and 'images'. You can set the label value to whatever you want. For the images parameter, click the 'Send file' checkbox and upload a jpg image in the value box.
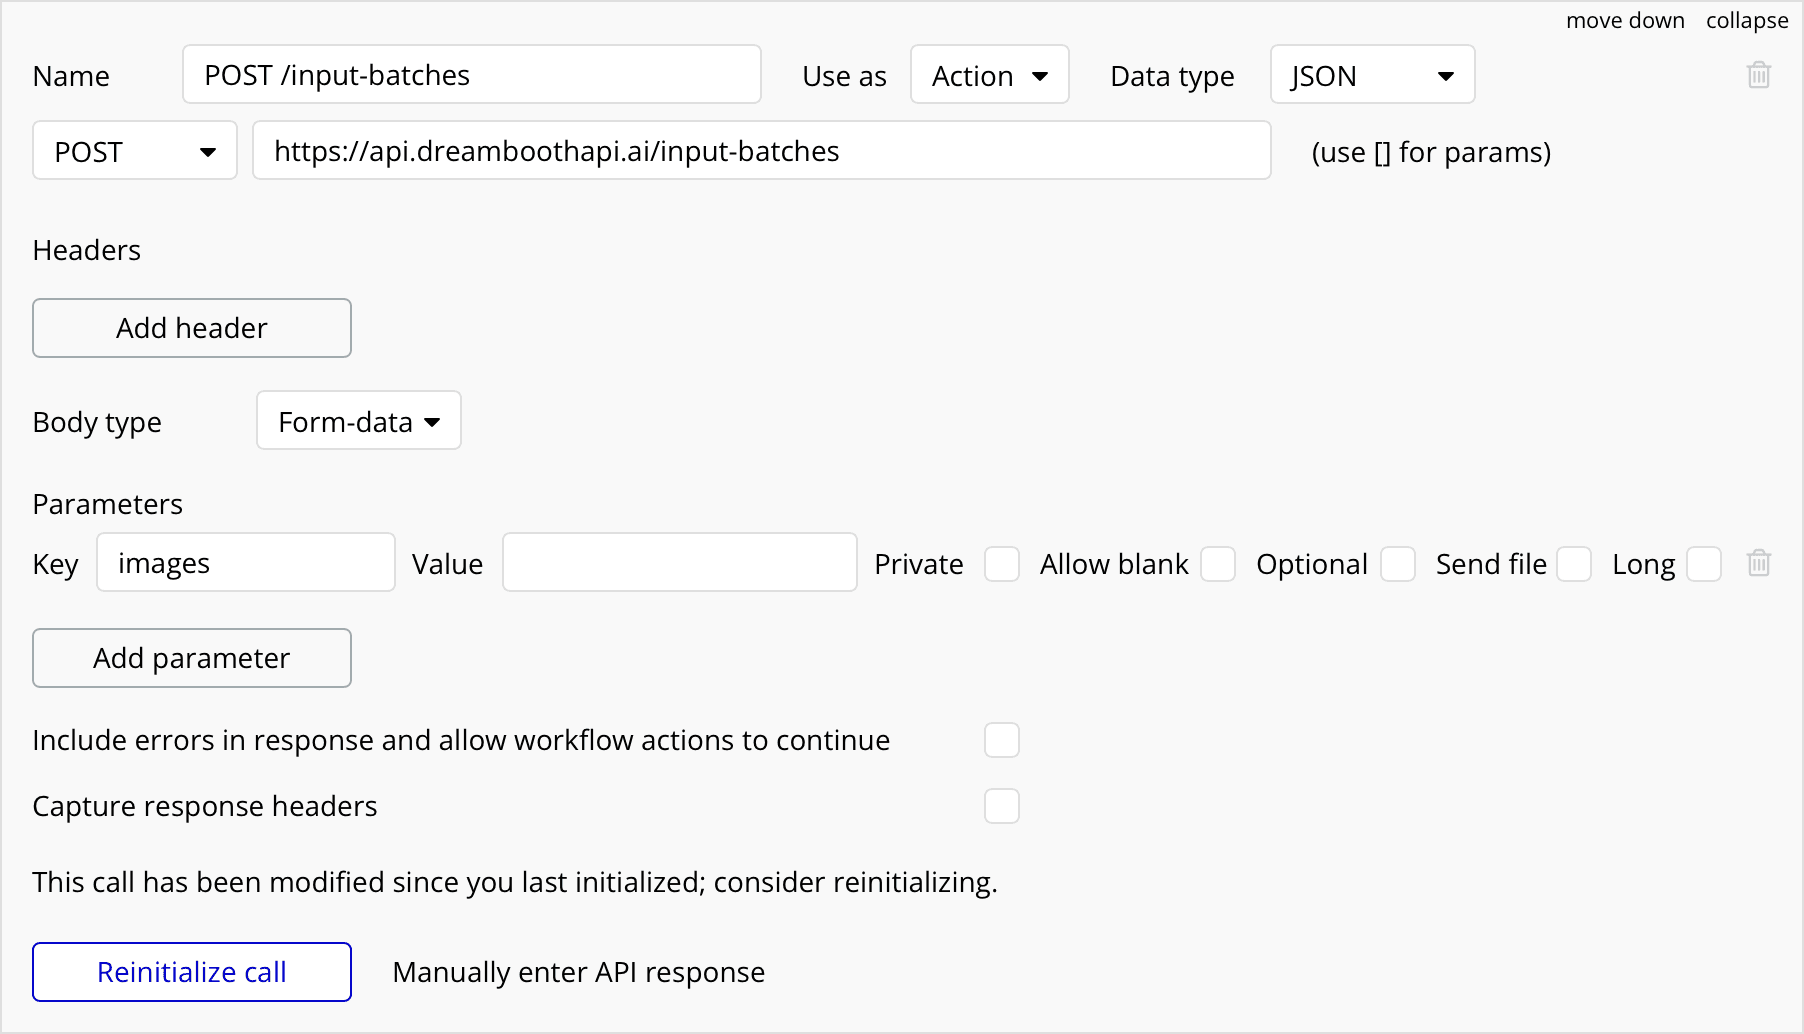
You can now click 'Initialise this call' and an API request will be made. Bubble will automatically parse the returning data – copy the returned ID and then hit save. Great, you've now added the first endpoint!
Creating POST https://api.dreamboothapi.ai/finetunes
Now let's add the POST https://api.dreamboothapi.ai/finetunes endpoint. In this case the 'Body type' is JSON. To keep this tutorial simple, we'll only use a few of the available parameters. Add the following to the Body section:
{
    "input_batch_id": "<input_batch_id>",
    "label": "<label>",
    "subject": "person",
    "fake": true
}
We don't want to spend credits while developing the Bubble app. Fortunately we can set fake to true, so that DreamboothAPI will return a 'fake' result with the expected shape. This means we can test the API and see its response for free. Just remember to take the 'fake' parameter away later!
The 'variables' inside < and > marks are dynamic values which we can automatically set later. For a test now though, we can add the ID of the input batch we created earlier to the 'input_batch_id' value, and we'll add a label too (the label doesn't need to be the same as the one used for the input batch).
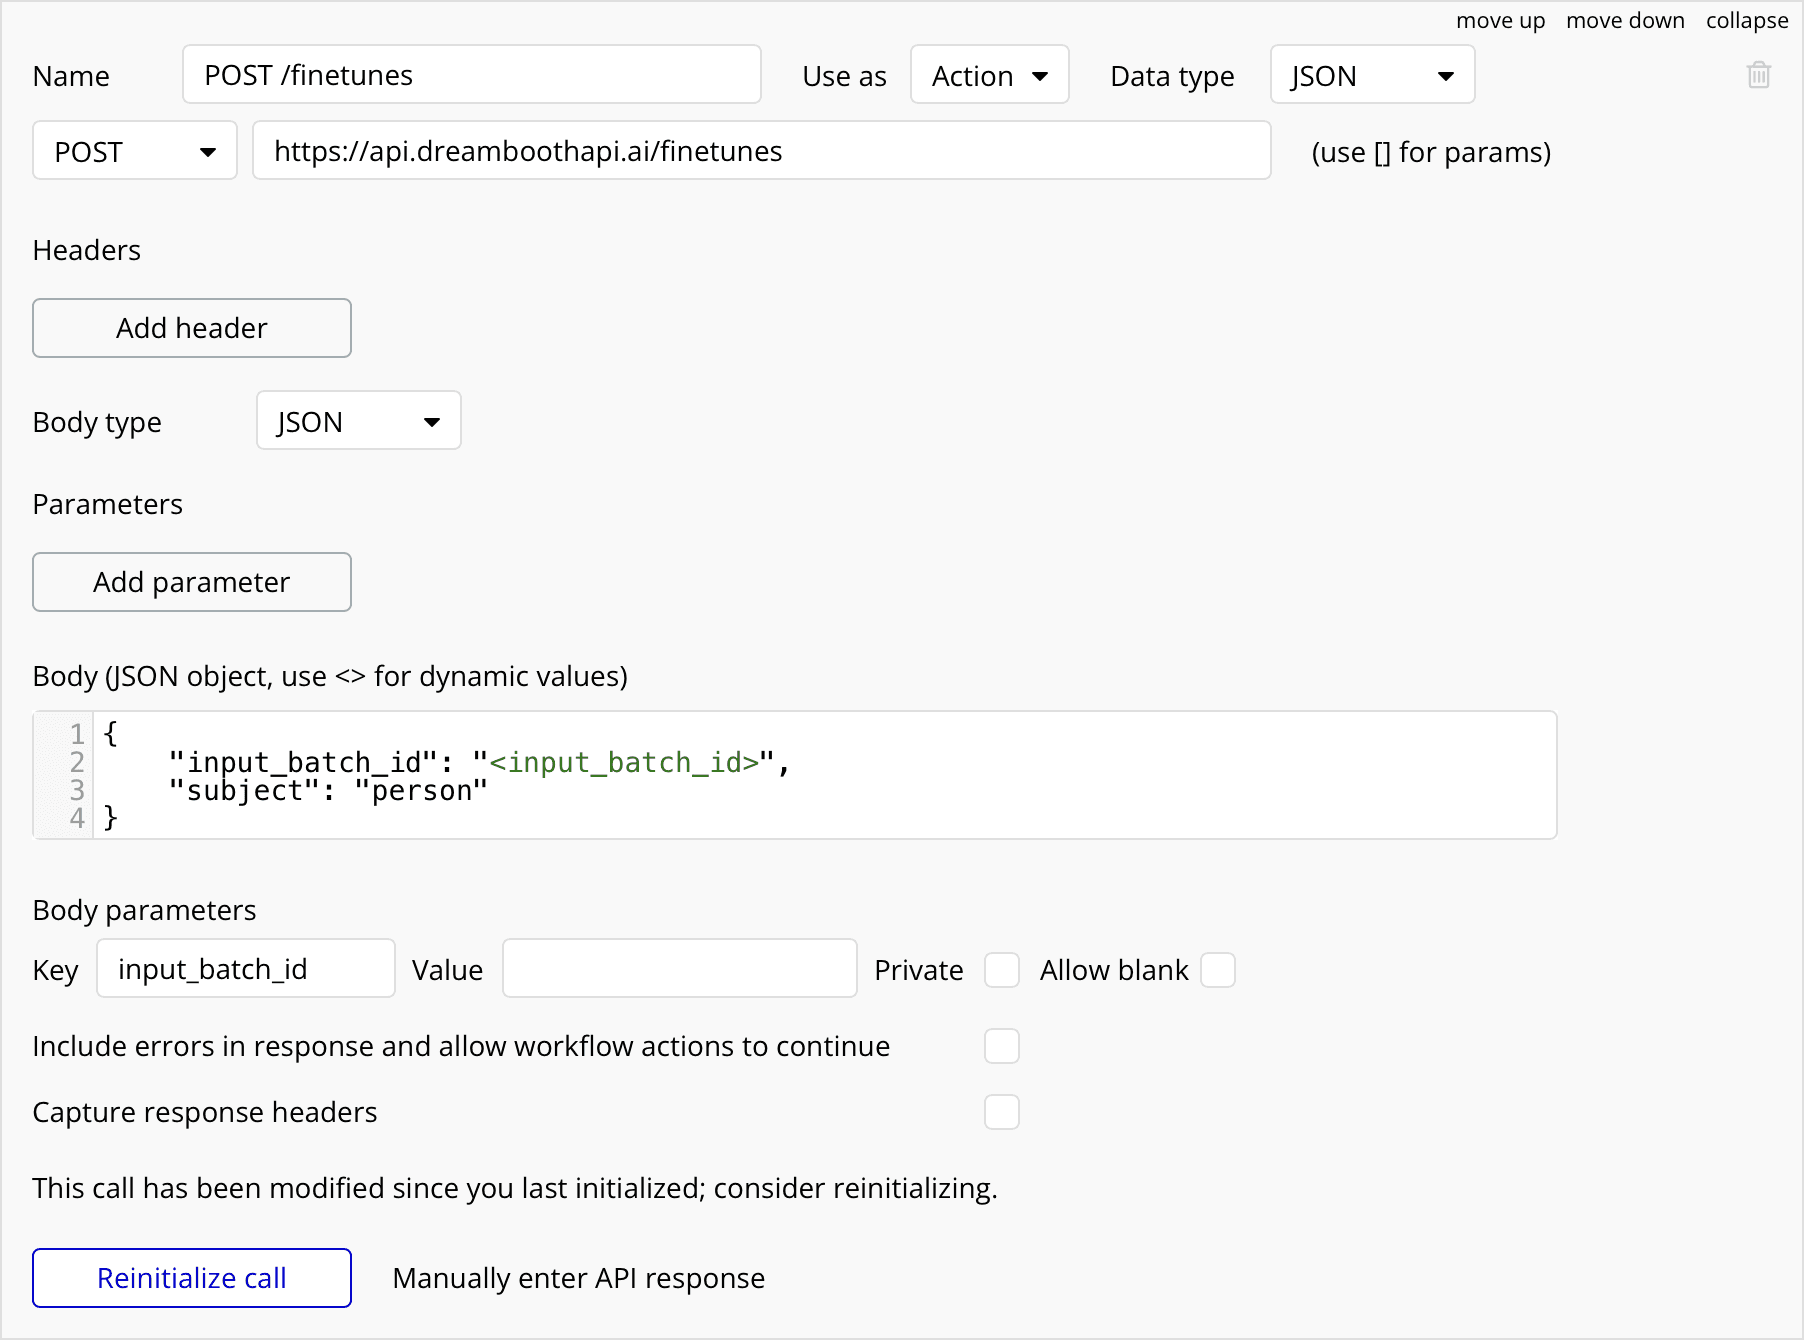
Click initialise call, copy the returned ID, and then click save to store the shape of the response in Bubble.
Creating POST https://api.dreamboothapi.ai/output-batches
Now it's time for the POST https://api.dreamboothapi.ai/output-batches endpoint. This one is very similar to the one we just made.
It uses a 'Body type' of JSON, and for the body we'll add this:
{
    "finetune_id": "<finetune_id>",
    "label": "<label>",
    "prompts": ["<prompt>"],
    "fake": true
}
Again, we're using 'fake' true as a way of spoofing a genuine request and testing DreamboothAPI without being charged.
Add the finetune id copied earlier into the parameters section, then choose a label, and then a prompt. Since this is a 'fake' request, it doesn't matter what you use.
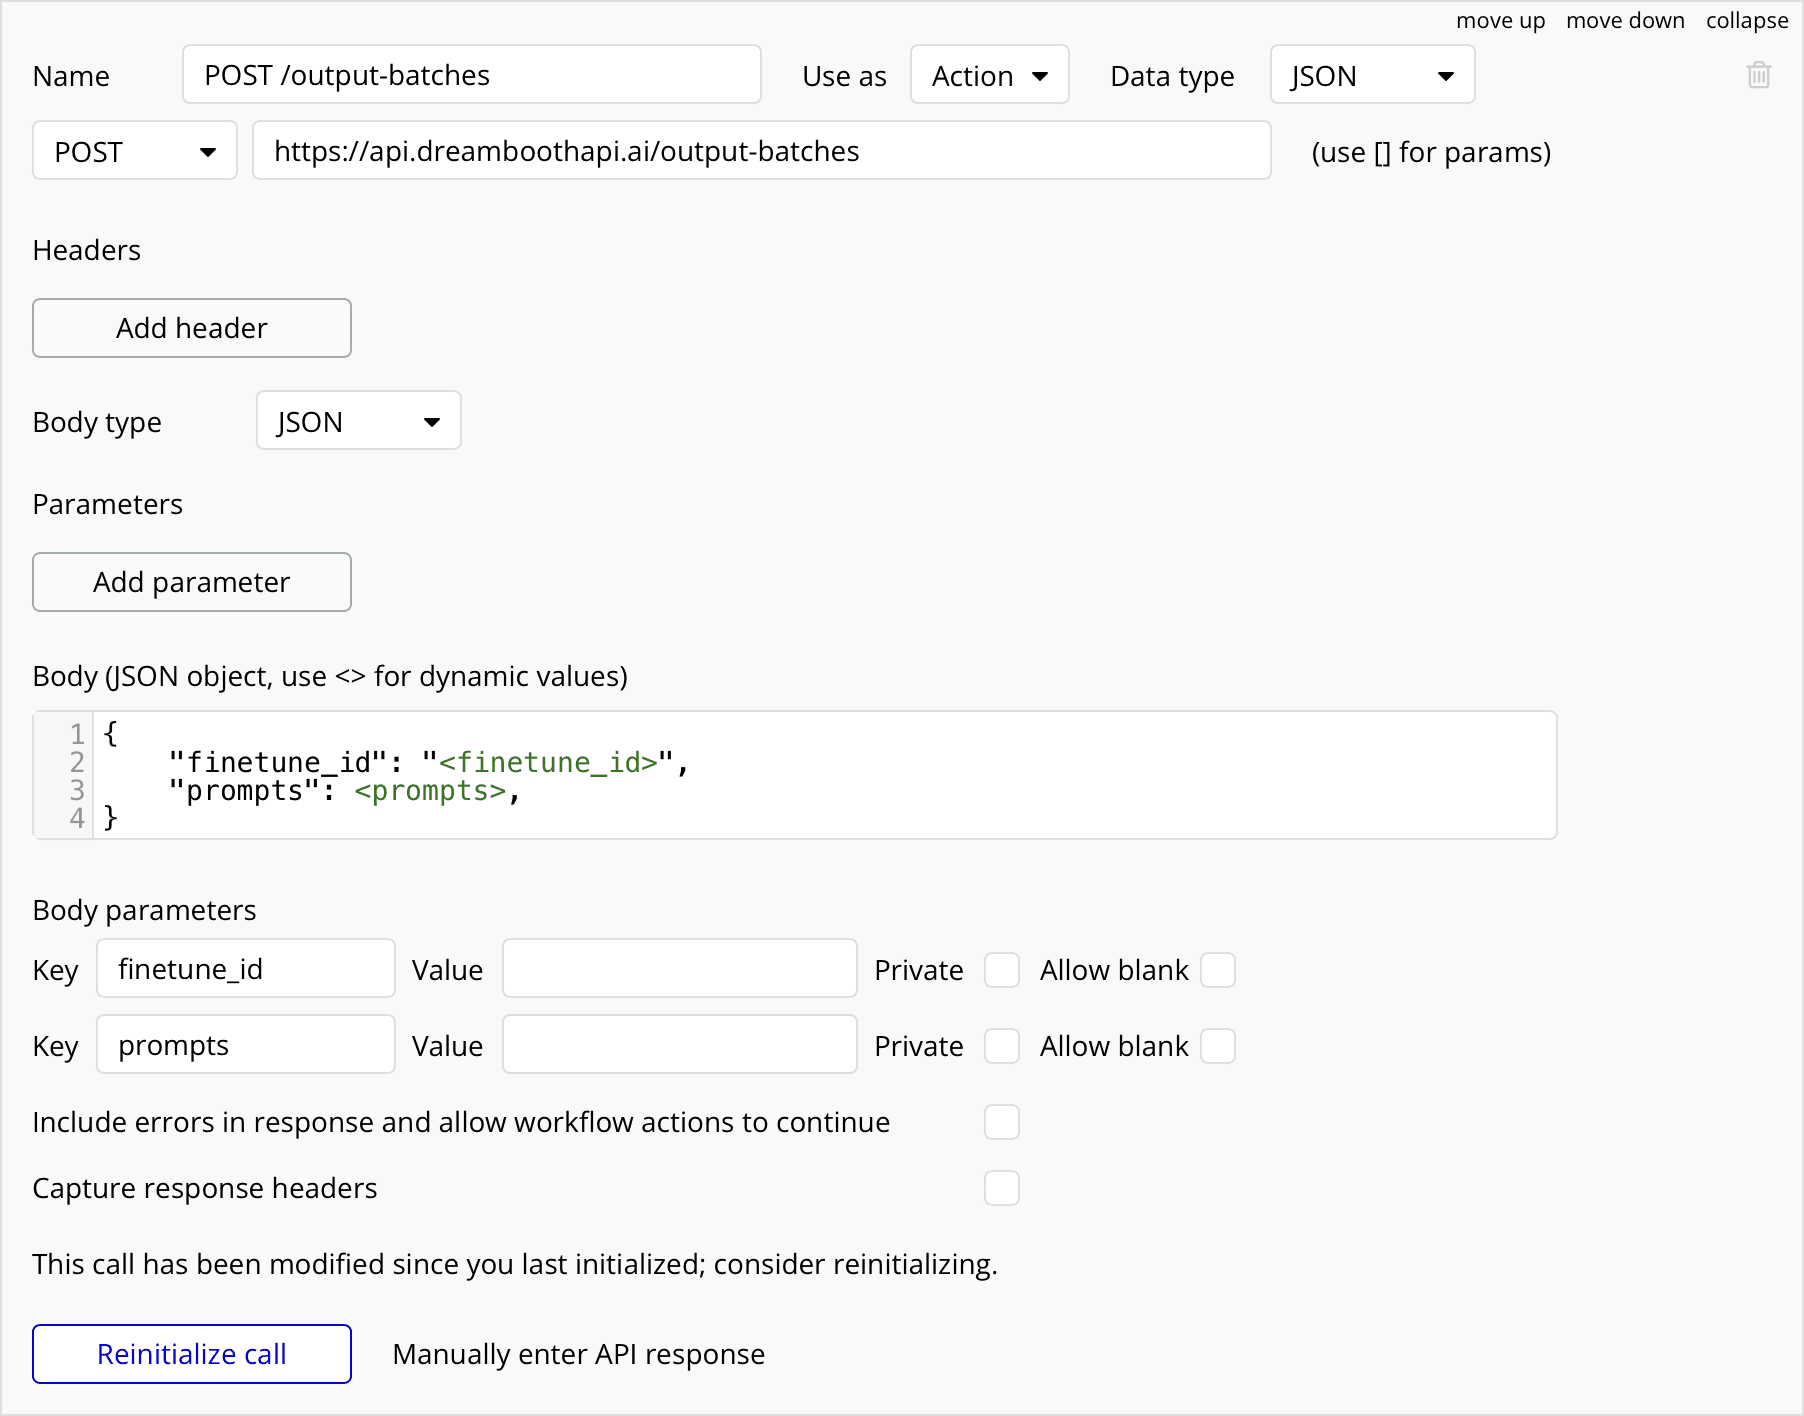
Initialise the call and then click 'Save'.
Great, we've set up our connection to DreamboothAPI! By using seperate concepts and endpoints for inputs, finetunes, and outputs, DreamboothAPI becomes a flexible and powerful tool for handling finetuned Stable Diffusion models.
Uploading input images
Add the File Uploader input form to your page so that your users can upload their images.
In the workflow panel, add a new workflow for Elements → An input's value has changed
Make sure your multi-file uploader element is selected. Then, add the action Plugins → POST /input-batches. Here you'll be able to add a label (you can make it dynamic but in this tutorial we'll keep it static), and the images from the multi-file uploader to the body of the POST request.
Bubble will automatically upload images to S3, so we can simply pass a list of the S3 URLs as the 'images' parameter. Click in that field, and press 'Insert dynamic data'. Now we want 'This Multi File-Uploader' ''s value' ':each item's URL. Finally we will add ':each item:find and replace' because the URLs stored by Bubble are not complete: we need to add the bit at the start which says 'https'. In the 'Text to find' field put "//" and in the 'Replace by' field put "https://".
Automatically starting a finetune after images are uploaded
Awesome! Now that we've set up the flow for creating an input batch, let's set up the flow for creating a finetune. For the next step in the workflow, let's add a new action Plugins → POST /finetunes.
In the `input_batch_id` field, click 'Insert dynamic data' and select 'Result of Step 1's id'. When an input batch is created, DreamboothAPI will return an ID. And when you're creating a finetune you need to which input images to use as part of the training dataset. This way, we can automatically link the resulting input-batch to a new finetune, and create it all in one step.
Great, so now when a user uploads some images, an input batch and corresponding finetune will automatically be created. Finally, we want to create some AI images from their finetuned model, but we can't create an output batch (a 'folder' of generations) until the finetune is complete!
Automatically starting an output batch after finetune is complete
DreamboothAPI provides the ability to be notified when a finetune is complete. When you create the finetune you can add an "on_complete_webhook" parameter, which is a URL. Let's take advantage of this so that we can be notified when the finetune is complete.
First we need to enable the Bubble workflow API, which will enable us to build a webhook endpoint. To do that, click 'Settings' in the left panel, and then click the checkbox for 'Enable Workflow API and backend workflows'. A URL will appear; copy this.
In the very top left, in the page selector, you can click 'Backend workflows' and access the backend workflows page. Click 'General → New API workflow...'. Let's give it the name "completed_finetunes". Make sure both "Expose as a public API workflow" and "This workflow can be run without authentication" are checked. Under "Parameter definition", use "Manual definition", and we'll add the parameters ourselves. They should look like this:
[{
    Key: id,
    Type: text,
    Optional: false
}, {
    Key: label,
    Type: text,
    Optional: true
}, {
    Key: state,
    Type: text,
    Optional: false
}, {
    Key: created_at,
    Type: text,
    Optional: false
}, {
    Key: completed_at,
    Type: text,
    Optional: true
}
]
Now the workflow is set up, we'll add the action Plugins → POST /output-batches. In the `finetune_id` field, you can select 'id' from the dropdown. For the 'prompts' field, in this tutorial we'll just use arbitrary text, but you can make it dynamic. Remember that prompts is a list, so wrap it in square brackets.
We'll add one more action, which is to store the id of the output batch (the folder containing the generated images) to the local Bubble database. Under "Data (Things) → Create a new thing", we'll create a new type which is 'output-batch' and we'll add the parameter 'id' by creating a new field with name 'id' and type 'text'.
Finally, we set this new id to 'Result of Step 1's id'. So when a new output batch is created, DreamboothAPI will return its id, and we'll store it so that the frontend of this Bubble app can get the generated images.
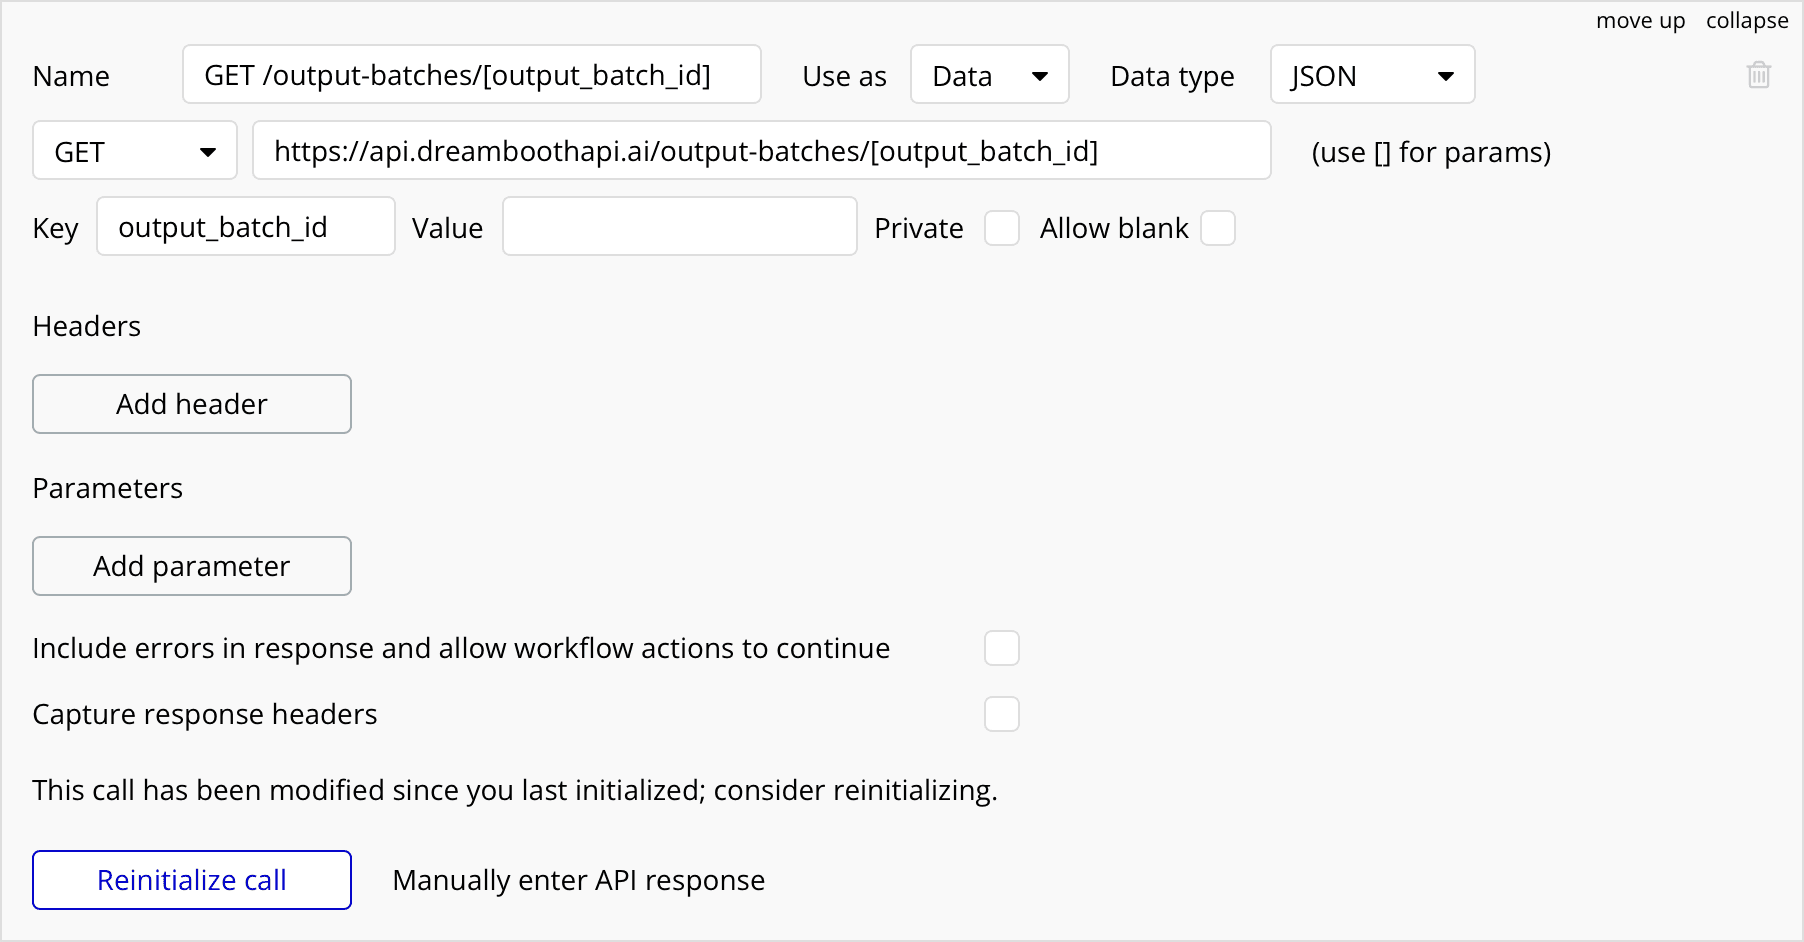
Creating GET https://api.dreamboothapi.ai/output-batches/[output_batch_id]
We need to add a GET request to fetch the completed output batch's images. For the URL let's set it to https://api.dreamboothapi.ai/output-batches/[output_batch_id]. We don't need any parameters at the moment. However, to initialise this call as required by Bubble we will need to have at least one not-fake output batch. Create a finetune and output batch as discussed above, using `fake = false`. Copy the ouptut batch id. Paste it in the 'value' section and initialise the call. Hit save to add in all the fields automatically.
Displaying generated images
In the design window, let's add a new Repeating Group for all of our images. I set it to be 4 columns wide and 2 rows high. I also stretched it to be full width although you can display your images however you like. The Type of content will be 'Text', and for the data source we'll click 'Get data from an external API', and select the GET request we just made as the 'API provider'. For the output_batch_id in the path, let's 'Insert dynamic data'. For simplicity in this tutorial we'll 'Do a search for' 'Output Batch' and just select the :first-item 's id. We're taking this 'thing' manually here but you will probably want to select the thing using some dynamic method. Finally we want to get the 'images' field from the response, which will evaluate to a list of texts.
Nearly there! Drag an Image component into the first cell of the Repeating Group. Adjust its display settings how you like. For Dynamic image, set the value to 'Current cell's text. As long as you have put the Image in the first cell and it's correctly nested, then you should see all cells receive the placeholder text. You're now ready to Preview / Deploy your app.